School Garden—Plastic Wading Pool Hydroponics
School gardens are a great way to get youth interested in where their food comes from (Ozer 2007). Interestingly, not all of our food is grown in soil. "Hydroponics," or the cultivation of plants in liquid nutrient solutions rather than in soil, is a fascinating way to teach students about food systems.
The term hydroponics is derived from the Greek words for "water" and "working." The ancient Egyptians described growing plants in water many thousands of years ago. The Aztecs used chinampas, a floating garden technique to grow vegetables for what is now Mexico City (Crossley 2004).
The Aztecs amazed the Spanish conquistadors with their floating gardens. Now, 500 years later, you can impress your friends and neighbors with yours (Sweat, Tyson, and Hochmuth 2013). A floating hydroponic garden in a wading pool is easy to build and can yield lots of nutritious vegetables. Best of all, hydroponic systems avoid many pest and nutrient problems commonly associated with growing plants in the soil. This publication will show you how to build your own hydroponic garden using a plastic wading pool and other easily located materials for about $50.00 (Figure 1).
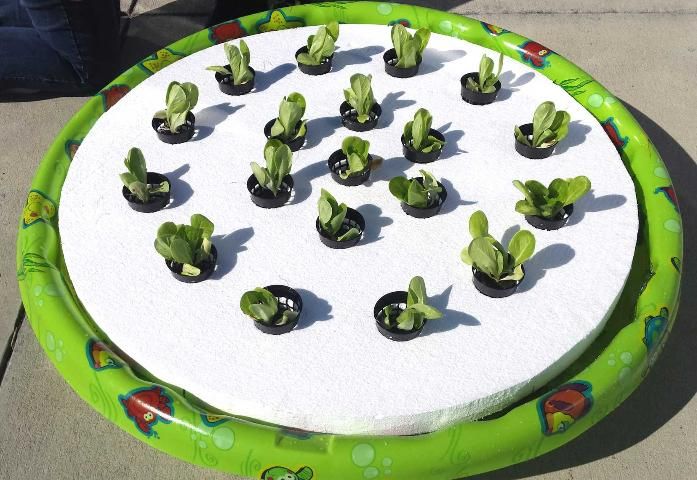
Credit: Edmund L. Thralls, UF/IFAS
Leafy crops such as lettuce (romaine, butterhead, and leaf lettuces), mustard greens, mizuna, mint, and kale grow best during the cool season. There are fewer crop options for the warm season; however, basil, Swiss chard, cucumber, watercress, and some cut-flowers, like zinnia and sunflowers, have done well in floating gardens in Florida. Production during the hot summer months is not recommended unless a 30–50% shade cover is installed above the wading pool.
Materials and Tools
Materials
- Styrofoam (4' x 8' sheet—either 1 ½" or 2" thick)
- 2" or 3" net pots or coffee cups with similar diameters
- Plastic wading pool
- Water-soluble fertilizer (for example, 20-20-20 with micronutrients)
- Epsom salts (magnesium sulfate)
- Large wooden spoon
- Young transplants
Tools
- Drill (electric or cordless with charged battery)
- Jigsaw or other saw to cut Styrofoam sheet
- Hole saw (appropriately sized to fit net pots or coffee cups)
- Permanent marker—medium point, black
- Tape measure
- Thumbtack
- 48" piece of nylon string
- Measuring spoons (teaspoon and tablespoon)
- Five-gallon plastic bucket
Construction Steps
- Obtain a children's wading pool 45"–48" in diameter. A wading pool can be purchased at many retail stores that sell children's toys. This size wading pool promotes little waste when trimming the Styrofoam; however, the size can be varied to suit personal needs.
- When locating a place to set up the wading pool in the school garden, choose a site that is in full sun (six hours a day), level, and free of any debris that could puncture the bottom of the wading pool. If vandalism may be a problem, use a location that can be seen from the classroom.
- Using a thumbtack or 1" roofing nail, pin the string to the center of a one-half sheet (4'x4') of Styrofoam. Tie the end of the string to the permanent marker so that the permanent marker is the appropriate distance from the center (about 20" for a 46" wading pool). With the string held taut, draw a circle with the marker (Figure 2).
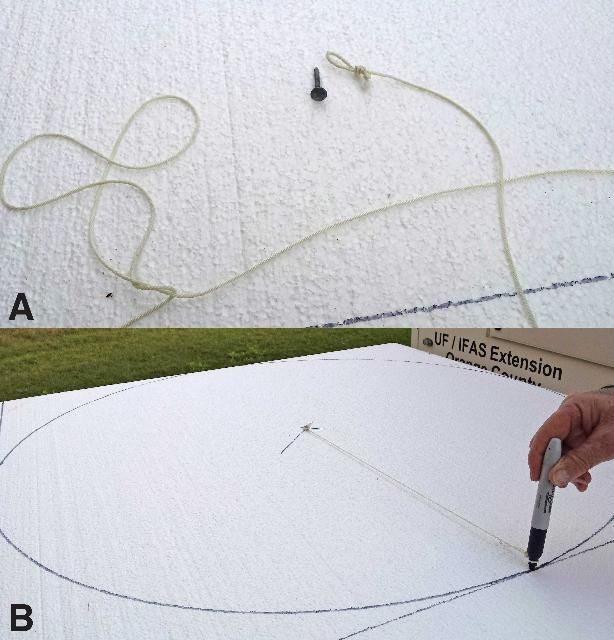
Credit: Edmund L. Thralls, UF/IFAS
4. Using the jigsaw or other appropriate saw or knife, cut the Styrofoam along the circular line made in the previous step. If this step is done in the presence of children, dust masks and eye protection should be distributed to minimize the effect of "dust" particles on the eyes and nose. Place the circle of Styrofoam in the wading pool and trim as needed to obtain the fit desired. Make sure the edges have sufficient room to allow the "float" to freely move up and down. The Styrofoam sheet will float in the wading pool once it is filled with water (Figure 3).
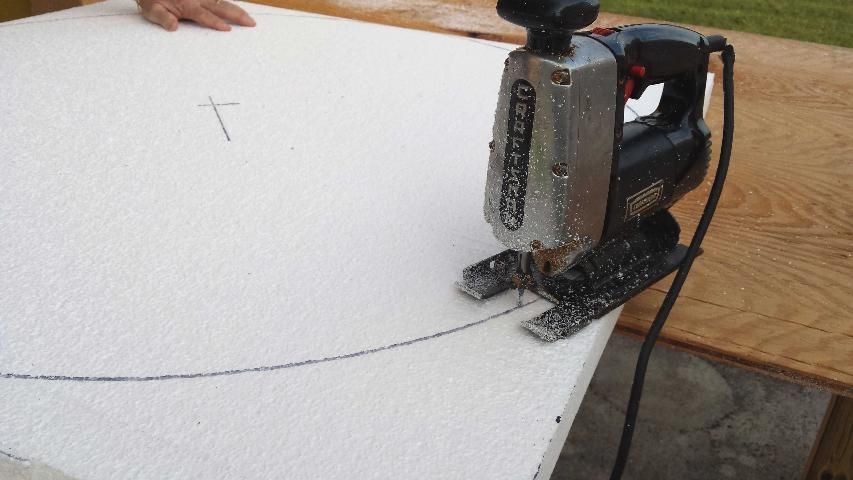
Credit: Edmund L. Thralls, UF/IFAS
5. Using the string, thumbtack or 1" roofing nail, and permanent marker, draw two concentric circles on the bottom of the float—one 6" from center and another 8" from the first circle (i.e., 14" from the center (Figure 4A)). Then draw 3 evenly spaced, intersecting lines on the float so you end up with six "slices" (Figure 4B). This simple activity may be completed by students to get them involved.
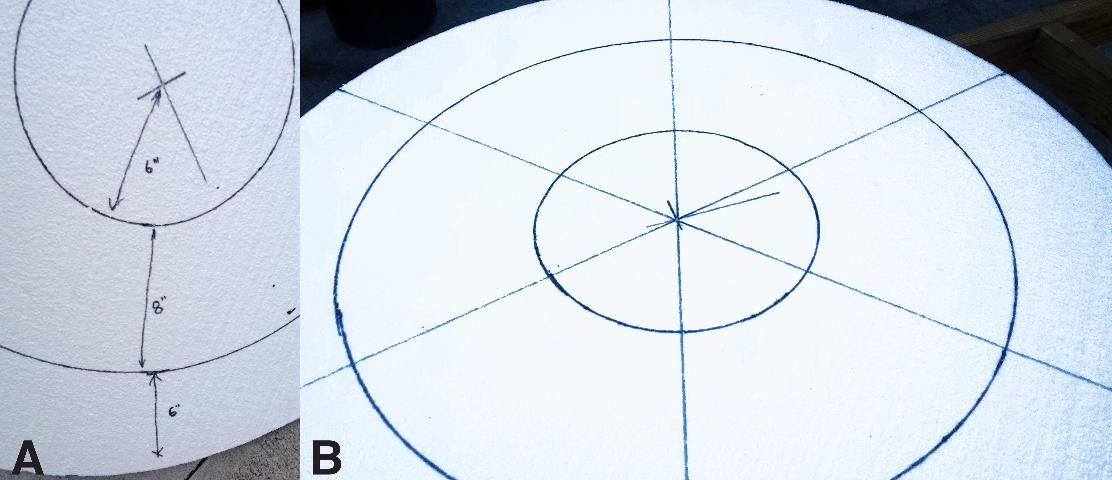
Credit: Edmund L. Thralls, UF/IFAS
6. Use a hole saw or sharp knife to cut holes in the float where the circles and lines intersect (Figure 5A). If this step is done in the presence of children, dust masks and eye protection should be distributed to minimize the effect of "dust" particles on the eyes and nose. Using 2" net pots will require a 1 3/4-inch hole saw for the 1-1/2 inch thick Styrofoam sheet (Figure 5B). The hole size should allow the bottom of a net pot to be level with the underside of the float. (Note: for 2-inch thick Styrofoam, a 2 5/8-inch hole saw is needed to drill the correct-size holes for 3" Net pot, easily found on the Internet, or Styrofoam coffee cups.)
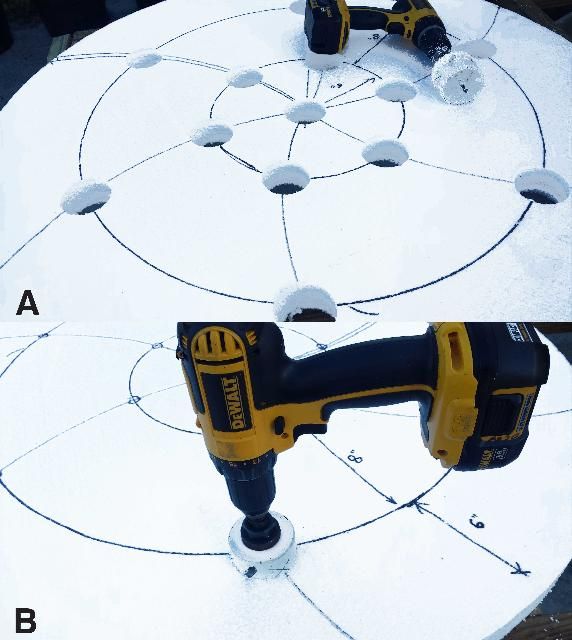
Credit: Edmund L. Thralls, UF/IFAS
7. Commercially available net pots (Figure 6A) or Styrofoam coffee cups with slits cut in the bottom that will fit in the hole in the float are used to hold the young seedlings. When placing the net pots or cups in the float, make sure that the bottoms do not extend lower than 1/16 inch below the bottom of the float (Figure 6B). This allows the roots of the plants to wick up water without being totally submerged (which can cause root rot and plant death).
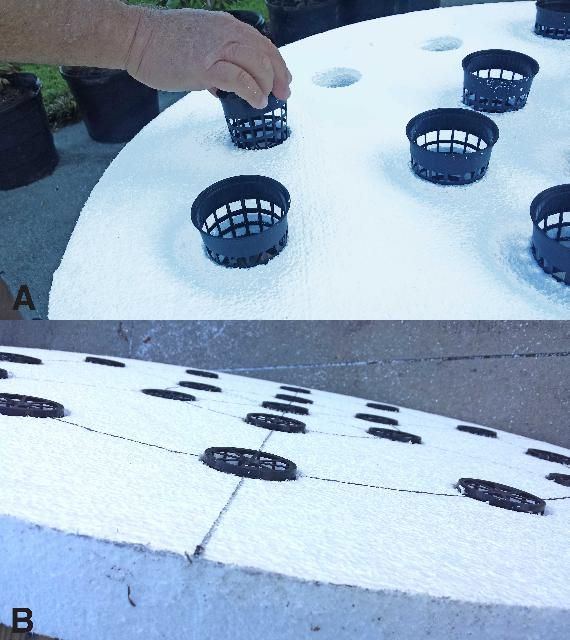
Credit: Edmund L. Thralls, UF/IFAS
8. Fill the wading pool with water to a total depth of at least five inches (this will take about 35 gallons of water). Use a 5-gallon bucket and keep track of the total gallons of water you add.
9. Add water-soluble fertilizer, such as 20-20-20 with micronutrients, at a rate of 2 teaspoons of fertilizer for each gallon of water used in the wading pool. In addition, add Epsom salts (magnesium sulfate) at a rate of one teaspoon for each gallon of water. Epsom salt is a very readily available and inexpensive source of magnesium that can supplement the low amount of magnesium found in the water-soluble fertilizer. Use a large wooden spoon to mix the water and fertilizer in the wading pool or premix all the fertilizers in a 5-gallon bucket then pour it into the wading pool and mix well. If premixing, add 10 teaspoons of fertilizer and 5 teaspoons of Epsom salts to each 5-gallon bucket of water, mix well, and pour into the wading pool. Or, assuming a total of 35 gallons of water, add 24 tablespoons of fertilizer and 12 tablespoons of Epsom salts to the last bucket of water, mix well, and then add to the wading pool. Place the float on the surface of the water-fertilizer mixture in the wading pool. This would be an excellent opportunity to get students involved by having them use their math skills.
10. Transplants used in this system should have a well-developed root system. Transplants can be grown in the classroom in potting mix or compressed peat pellets purchased from local garden centers. This is also an opportunity to get students involved. Set the containers with potting mix or the compressed peat pellets on a tray and let them germinate near a bright window in the classroom. If this is not possible, consider building a portable plant lighting system (Brown et al. 2011).
11. Place young transplants directly into the net pots or cups. Use toothpicks, if desired, to hold the transplant in an upright position. Do not remove the potting soil from the transplant or add additional soil to the net pots or cups. A flat-bottomed peat pellet (such as Jiffy-7) will wick up more water than a tapered root ball will. If the media seems too wet, tilt the cube so only a portion of the root ball actually touches the water.
12. Add extra water and fertilizer as needed to keep the float floating on a minimum of 5-inches of solution. Heavy rainfall will require fertilizer adjustment based on the amount of water added by rainfall.
13. The solution in the wading pool needs to be replaced periodically for optimum production. For example, you can grow two crops of salad greens in the same solution before replacing the solution.
Crops
As mentioned above, numerous crops can be grown easily in a wading pool hydroponic garden. Small-rooted, short-season crops generally grow well. Plants that prefer wet rooting conditions grow better than those that prefer dry conditions. For example, watercress grows very well, but periwinkle (vinca) does not.
Summer is a challenging time to grow vegetables in Florida. Consult the Florida Vegetable Garden Guide for planting dates (https://edis.ifas.ufl.edu/vh021). Furthermore, summer temperatures will heat the water in a wading pool garden located in full sun and can stress plants. A structure covered in 30% or more shade cloth may improve success with summer crops. However, this may not be an issue if the school garden is shut down for the summer vacation.
For more information about plastic wading pool hydroponics and growing vegetables in Florida, contact your local UF/IFAS Extension office.
References
Brown, S., K. Ruppert, K. Hendry, and B. Shutzman. 2011. How to Build a Plant Lighting System. MG341. Gainesville: University of Florida Institute of Food and Agricultural Sciences. Accessed January 2, 2016. http://ufdcimages.uflib.ufl.edu/IR/00/00/38/76/00001/MG34100.pdf
Crossley, P. L. 2004. "Just Beyond the Eye: Floating Gardens in Aztec Mexico." Historical Geography 32: 111–35.
Ozer, E. J. 2007. "The Effects of School Gardens on Students and Schools: Conceptualization and Considerations for Maximizing Healthy Development." Health Educ. Behav. 34(6): 846-863. doi: 10.1177/1090198106289002
Sweat, M., R. Tyson, and R. Hochmuth. 2013. Building a Floating Hydroponic Garden. HS943. Gainesville: University of Florida Institute of Food and Agricultural Sciences. Accessed October 6, 2015. https://edis.ifas.ufl.edu/hs184
